Do you usually take your latest completed piece to a professional for framing cross stitch? You’re certainly not alone since many stitchers do. Perhaps that’s what you too have done in the past, and are perfectly happy with the results.
On the other hand, you may have done your own cross stitch framing and have been less than happy with the results. Or you may simply feel it’s time to try and do it yourself…
Checkout this short video for a brief tutorial on recommended finishing practices and framing cross stitch pieces in general:
It’s highly likely, if you have previously purchased a cross stitch book, chart or kit, you will already have instructions for at least two or three different framing cross stitch methods. After trying to frame a couple of completed projects, you probably prefer one method over others.
In this article, we shall focus on the framing cross stitch method we use that yields good results, protects your cross stitch pieces, and lasts for years…
Table of Contents
But first, let’s consider the aesthetics of framing
A cross-stitched project is so very special and during the process of stitching you will have developed a mental picture of how it will look when completed and framed. Features you may consider include: how much unstitched fabric will be visible around the edges of the design, and whether you will use a mat.

If you choose to use a mat you must also decide on the color, size, and shape as well as whether the design will be enhanced by the use of multiple mats. A mat, even with a very small design, can add drama and focus to your design.
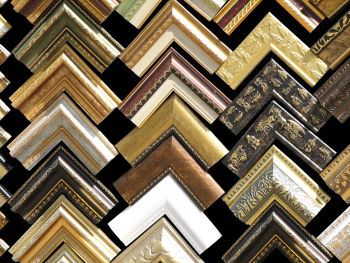
The other major element of your masterpiece is the frame itself. Placing a cheap clip-frame to a traditional sampler will probably not do justice to your hard work. For smaller designs, you may find a suitable ready-made frame for your design in any store that sells frames.
for cross stitch pictures.
You may even find appropriate frames in thrift stores or yard sales. For larger pictures, it is often necessary to have a frame custom-made at your favorite framing shop.
There’s a huge range of attractive frames available, as shown here in the illustration on the right.
To make the decision-making process easier, it is a good idea to take your finished project with you to the framing shop where you can try out different mats and framing materials.
Bring in the professionals
Being a professional, the framer will give you options and advice that you did not anticipate. There, you will be able to experiment with the mat colors available as well as options for your frame.
This is a good time to measure your design to determine the inside dimensions of your mat or frame. Once you have made your choices, remember to order a piece of glass to fit your frame.
Before leaving the shop, have a stretching board cut. When framing cross stitch, my personal preference is a grey stretching board approximately one to two inches larger than the design. (You will find that the grey board behind your project will make any threads carried behind blank fabric less visible.)
Although you can cut the stretching board yourself, the framing shop can do a more precise cut, which will make the mounting process easier.
Washing your cross stitch piece
With your mind made up about the frame and stretching board, you are ready to prepare your needlework while waiting to pick up your order. First, you should consider washing your cross stitch piece because oils from your hands could well result in discoloration.
There may also be dust or other stains on your work as well. If you don’t remove these marks and stains at this point, you’ll become disappointed with your efforts as time goes by. This is because even slightly dirty fabric will discolor over time.
Mounting your cross stitch piece
Having now washed and pressed your needlework, you’re now ready for the actual task of framing your cross stitch project. You begin by mounting your needlework on the stretching board, as follows:
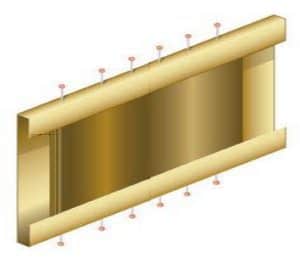
- Center the board on the back and place stainless steel pins in both sides and each end. Now, with all sides equal, follow the thread line to each corner, placing pins at quarter inch intervals along the edges of your board. Push the pins firmly into the edge of the board to prevent them from falling out as you work your way around.
2. With your needlework completely pinned, you are ready to attach it to the board. Turn your work face down and place acid-free, double-sided tape along all edges of the back side of the board. Starting in the center of each side, anchor the fabric to the tape by pulling it snugly over the edge and against the tape. When all four sides are secure, press the fabric to the tape. Use acid-free masking tape to secure the edges of the fabric to the board on all four sides and miter the fabric in each corner. Remove all of your pins and the piece is ready to frame.
Are you using a mat?
3. If you are using a mat, use your acid-free tape around the inside edge on the back of the mat. Then center the mat over the design area and press it into place. Turn the mat and needlework face down and use packing tape to provide additional support for your mounted piece. However, if the project is large, it may be necessary to provide even more support once the piece is placed in the frame.
Measuring the distance to the inside edge of the frame and cutting a piece of acid-free foam board to fit the space will provide additional support. If using foam board as a filler, it can be secured with either the double-sided tape or packing tape. Note: NEVER use cardboard for framing cross stitch; it is composed of unrefined paper with a high acid content.
Make sure the glass is really clean
4. Next, clean the side of the glass that will be inside the framed piece using non-ammonia glass cleaner and, if possible, a micro-fiber cloth. Also, paper towels may work just as long as no lint or fibers remain on the glass. Place the mounted needlework into the frame and secure all four sides with one push point glazier (click here for a very short tutorial on using push point glaziers) or strip of glazing bead. Turn the piece over and double-check for any hairs or dust particles.
Close off the back of your project
5. When you are satisfied that the inside of the glass is spotless and nothing has crept inside, place more strips of glazing bead or push point glaziers into each side of the frame to secure the piece. Next, apply two-sided tape to the back of the frame. Smoothly cover the back of the frame with brown craft paper or wrapping paper. Before finally trimming the excess with a single-edged razor.
Fit attachments for hanging your project
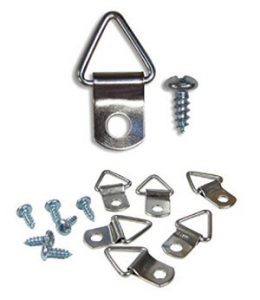
6. Depending on the size of the framed piece, attach D-ring picture hangers with wire for larger pictures or a saw-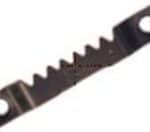 tooth hanger (left) for a smaller piece. If using a wire to hang the piece, the placement of the D-rings should be approximately one third the distance from top to bottom of the frame. Place rubber bumpers on the bottom corners of large frames to protect the surface of the wall.
7. Finally, clean the outside of the glass – job done!
You are now ready to hang your completed framed cross stitch project or give it as a gift – well done!
Did you find this article helpful? Do you have an alternative method for framing your cross stitch project that works for you. If, so, I’d love to hear what experiences you’ve had when finishing your own framing cross stitch. I answer all emails received. So if you’ve any stories, comments, or questions – please feel free to send them this way.
Click here to check out the latest picture framing supplies and accessories on Amazon.
’til next time – believe in yourself.
John
